
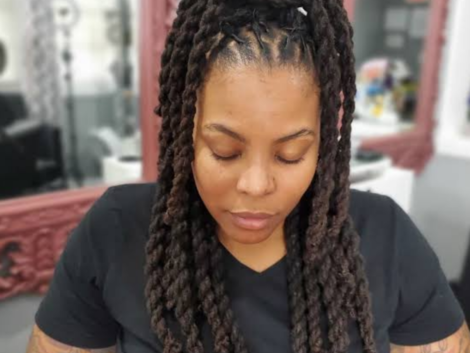
The Senegalese twist is a protective hairstyle many women use to keep their natural hair safe and promote growth. There were only one or two protective hairstyles in the past, but now you can choose from many choices.
Considering that, how good are Senegalese twists for your hair? Should you choose this hairstyle? Well, if you are wondering more about this protective hairstyle and how you can achieve it, this is the perfect article for you. Read to learn how to achieve this perfect look for all hair lengths.
Are Senegalese twists best for beginners?
If you are a beginner in making your own protective hairstyle and want to try the Senegalese twists, is it beginner-friendly? Well, read on to know the answer.
It is considered that the Senegalese twists are hard to make for beginners because they require some skill and practice to install properly. However, with some patience and guidance, it is possible for beginners to learn how to install Senegalese twists. It is important to be patient when trying this hairstyle for the first time.
This hairstyle is difficult or challenging for beginners because it is important to ensure that the twists are even and the parts are straight. This can take some practice, and it is important to work slowly and carefully to avoid mistakes. Moreover, these twists are typically smaller and require more sections of hair to be twisted, which can be time-consuming. This is why this hairstyle takes more effort and time, which can be hard for the first-timer.
However, it is still not impossible for a beginner to learn this hairstyle. You need a good tutorial and patience and might need to repeat some strands; take your time, start with larger sections of hair, and work your way up to smaller sections as you gain more experience. You may also want to consider practicing on a mannequin head or on a friend before attempting to install the twists on your own hair so you know the technique to use.

Senegalese twist tutorial for beginners
The hands-on demonstration is the best way to learn how to create Senegalese twists. However, we can still mention the steps so that you know what you should expect from a tutorial. Also, this can help you prepare better before committing to this hairstyle. Here are the general steps.
Step 1
The first step is to start with the hair that is prepared. This includes starting with clean and detangled hair that is also dry but not too dry so that it is considered brittle. You should use a leave-in conditioner but ensure that the product is not too greasy either, as that can make it hard to twist the hair.
Step 2
Decide on the type of extensions that you will use because you will need extensions for this hairstyle. There are two famous types of extensions for this hairstyle: kanekalon (silky braiding hair) and toyokalon (yaki braiding hair). You can use 3 to 4 packages of hair extensions, but this again depends on you.
Step 3
Now you need to part your hair as you want it to be before you start sectioning it. Now start sectioning hair into quadrants, and then divide those sections further to get very small sections. Each section should be around 1 inch in size. Now add extensions to each section of your hair.
Step 4
Take each section, twist it into a coil, and twist your extensions. Keep coiling until there are coils that reach the end of your hair extension. Then wrap the two coiled strands against each other. The right-hand section should be wrapped clockwise, while the left-hand section should be wrapped counter-clockwise to achieve tight twists that are then secured with a knot.
Step 5
Repeat this with all sections of your hair, and ensure they are coiled equally and look identical. After this, you can dip the ends of the hair into boiling water to seal off the ends. Keep the hair in hot, boiling water for a few seconds, and you are done with the process.
What is a good Senegalese twist on DIY?
There is a DIY way to make the Senegalese twist as well. This makes the process easier, especially for beginners. The process is called the rubber band method. It is a method of securing the extension hair to your natural hair with rubber bands. And it is done in the following way.
Step 1
You start the same way: by sectioning your hair. But when you place the hair extensions, it needs to be folded in half. Place the folded end of the extension hair against your natural hair, with the looped end of the extension hair pointing upward.
Step 2
Now, you need to use a small rubber band to secure the folded end of the extension hair to your natural hair. Make sure the rubber band is tight enough to hold the hair in place but not so tight that it causes discomfort or breakage, which can be counterproductive.
Step 3
After this, the above steps are followed: twisting the hair and applying the hair extension. You can see a video on how this process is done properly. After you are done, seal the strands like before.

How is the Senegalese twist touch-up done?
Senegalese touch-up is done when the twists start unraveling. This means that there are new hair strands showing up. The old strands are also losing their twists since it’s been so long. This happens after 3 to 4 weeks of keeping the twists.
During the touch-up, the braids are re-done, which is a long process, as long as the process of twisting hair in the first place. In the touch-up, the sectioned hair accessories, like beads, are removed using hands or pliers. After that, starting at the back of your head, the twists are gently unraveled using your fingers or a rat-tail comb. It is important to be gentle to avoid causing damage or breakage to your hair.
After that, the hair is combed thoroughly, and a leave-in shampoo is applied to lock in moisture and make it easy to comb. The last step of the touch-up involved the twists being made again; we already know how that is done from the sections above.
Which is better, the Senegalese twist vs. the braids?
Both Senegalese twists and braids are perfect protective hairstyles that women have been doing for centuries. These have different properties and suit different people.
For example, if you are an active person who runs around, box braids are better as they hold onto their shape better and do not unravel easily. However, Senegalese twists are much easier to do than any braids considering it’s just twisting two strands around each other, which is why beginners can do it easily by themselves. Senegalese twists also need more maintenance as they unravel more easily and thus cannot be used to make many hairstyles as the braids allow.

What do reviews say about a Senegalese twist?
Most reviews about the Senegalese twists are positive, and people love how low maintenance it is.
People also love how these twists can be styled in many ways, and it they resemble natural hair. Thus, it looks very natural and beautiful. Moreover, these braids are very comfortable and do not cause strain as some other protective hair can. These can also last as long as you wear a silk bonnet before bed and care for your hair.
Conclusion
If you want to get Senegalese twists, it is a great option, and you can even do them at home. Having some experience is better, but you can also do this as a beginner if you do not. Hopefully, now that you know more about these twists, you will use them daily.
Lastly, check out the mane caper shop.